Showing posts with label Craft Time. Show all posts

Friday, July 16, 2010

Super Hero Cuffs

It's a bird! It's a plane! No. It's Super Nater rockin' his super hero cuffs! Schweet!


After working a full day, commuting about 1 - 1.5 hours each way and spending time with my family, I am not left with very many hours minutes in the day. So I am ALL about finding easy crafts to create -- and this is one of them!

What you'll need:
  1. The cardboard roll from a roll of paper towels (one roll makes 2 sets)
  2. Color felt
  3. Elastic
  4. Hot glue gun
  5. Scissors
  6. Box cutter or exacto knife or other hole making device
Step 1: Take your cardboard paper towel roll and cut it down the middle from top to bottom.

Step 2: Measure and cut out 2 1/2 inch sections. One roll should yield 4 cuffs.


Step 3: Cut out different color felt pieces to cover the bare cardboard strips. (Using the cardboard roll helps give shape to the cuffs. ) Be sure to leave an additional 1/2 inch of felt on each side. Using the glue gun, glue the strip onto the roll and wrap the extra 1/2 inch of felt around to the back and glue on as well.


Step 4: Using a box cutter, exacto knife, hole punch (whatever you can find), make an incision on either ends of the cuffs. String through some elastic band and knot off at the ends. This will keep your cuff secure and in place when battling the evil doers.


Step 5: Using scrap pieces of felt, cut out different patterns and hot glue them on.


Super Easy. Super Cute. Nater Tater just loved them!

Wednesday, June 30, 2010

Tutu - Part Tu

Here's another version of the Elastic Band Tutu, but instead of using an elastic band, I used ribbon. Before you start adding on the tulle to the ribbon, be sure to knot off both ends leaving about 18 inches of ribbon to each side. This will be used to tie the tutu around the waist.


This will be one of the couple of Tutus I will be donating to the Tutu Drive 2010. I had made two earlier, and had Rusty model them. Well I wasn't thinking! Because the Tutus that are getting donated to the Alexa Foundation need to be new and never used. The kids that these dress up clothes are going to have very weak immune systems, so they need to take every precaution to make sure no germies get them sick. Hello Nelly?! Why didn't I think about that? So brand new Tutus will be made, sealed and donated. :)

Tuesday, June 22, 2010

Tutu Made Simple

Okay, so this has got to be the easiest Tutu tutorial ever! It takes no time to make and comes out super cute!

(I don't have a cute little girl to model my Tutus, so I used Rusty instead. Yes, he is a boy dog... but really, it's OK, he didn't mind)


What you'll need: (this makes a size 2T-3T)
  1. Elastic band (19 inches long)
  2. Needle & thread
  3. Tulle. I bought mine in rolls at a fabric store for $2.99/roll. Each roll was 6 inches wide x 2 yards long.
That's it... really.

Step 1: Take your elastic waist band and overlap the ends about 1/2 inch. Stitch together.


Step 2: Take your tulle and cut into 24 inch strips. For my tutus, I used about 35-40 strips.

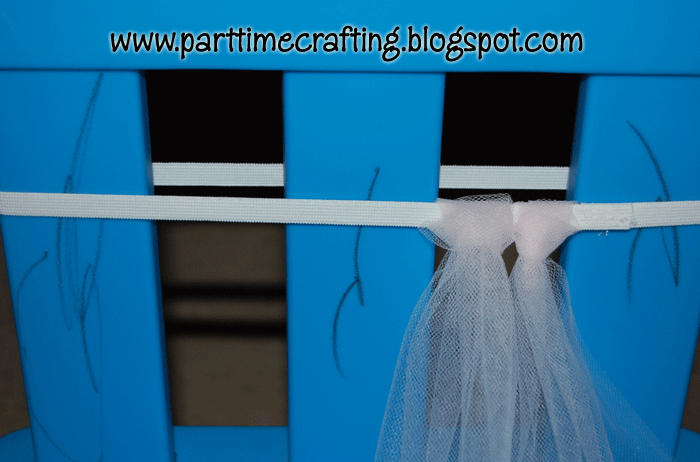
Step 3: Take one strip of tulle and fold in half. Insert folded end behind your elastic band. Pull loose end through the hole to form a "knot." I think this picture can describe it better than I can.


It also makes for easier work if you wrap your elastic band around a chair. I used my son's chair that was in the play room. It was the perfect width. PS: don't mind the lovely artistic work on the furniture -- courtesy of Nater Tater.


Step 4: Repeat step 3 until your tutu is as full and fluffy as you'd like. The pattern I used for the Pink & White Tutu was 3 pinks/2 whites. And for the Red & Black Tutu, it was 2 reds/2 blacks. Tulle comes in a variety of colors... so the possibilities are endless!

After you have all the tulle on and in place -- tighten each knot slightly. This will help them from getting undone.

Step 5: Admire your work! :)


See. I told you it was EASY!

Both Tutus will be donated to the Tutu Drive 2010 for the Princess Alexa Foundation. If you feel inspired to make your own and would like to donate it as well, visit here for details.


Samster Mommy's Tutu Drive 2010

Samster Mommy Tutu Drive

One of my favorite blogger, Samster Mommy, is holding a Tutu Drive 2010 for the Princess Alexa Foundation. The Princess Alexa Foundation was formed in August 2008 in memory of Alexa Aigner, a beautiful 4-year-old girl who loved dressing up to escape the reality of cancer. Their mission is to celebrate the childhood spirit of seriously ill children through dress up and play. Amazing, no?

My next couple of tutorials will be on making Tutus and donating them to Samster Mommy's drive. They are pretty simple to make and if you feel the urge to get crafty... come join me and help by donating your creations too! I'll have more details on where and when to donate.

Let's do this, and help Samster Mommy reach her goal of 100 Tutus!!!

Saturday, June 19, 2010

Body Pillow Case

Last year, my parents went to Vietnam on a mini vacay and brought back this super soft, super cuddly, body pillow for Nater-Tater.


As cute as the butterfly and two-toned green pillow case is... it just doesn't go with the "Disney Cars" themed room he has. So as my first project with my newly acquired sewing skills, I decided to make a new body pillow case for him.


We still had Nater-Tater's Disney Cars crib bedding, and the flat sheet was just the right size for this.

First, I removed the green butterfly case and laid it directly on top of the folded flat sheet. I trimmed the new flat sheet to fit (leaving approx. 1 inch extra around)


Next, I folded down 1" on the top (what will be the top) and stitched it right down the middle (leaving a "pocket" where I will be inserting a strip of fabric that will hold the pillow case on.) Repeat step to bottom of case.


Next, stitch the long sides together, but be sure not to stitch the openings of the pockets closed! Then string the strip of fabric through the top and bottom. To make this step easier, pin your strip of fabric to a safety pin, it'll help you guide it through.

Finally, insert body pillow into your new case, tie off the ends and enjoy!